How to Replace a Shower Pump: DIY Steps & When to Call a Plumber
- Office Admin
- October 16, 2024
Replacing a shower pump usually involves isolating the water supply, disconnecting the old pump, fitting the new unit correctly and checking for airlocks or leaks before restarting the system.
Shower pump replacement involves removing a faulty or noisy unit and installing a new pump to restore proper water pressure. Professional replacement costs vary depending on pump type and pipework layout.
Replacing a shower pump usually takes 2–4 hours for a qualified plumber. While some experienced DIY homeowners may attempt it, the job involves plumbing connections and electrical isolation, so professional installation is often recommended to ensure safety and protect the manufacturer’s warranty.
Below, we explain how shower pump replacement is done step by step — and when it may be safer to call a professional.
If your existing pump has failed completely, our Shower Pump Replacement Dublin service can supply and install a suitable replacement across Dublin.
Step 1: Turn Off the Water and Power
Safety first!
Switch off the power to the shower pump. If you are unsure of the power supply location, it is usually connected to a fused spur near the pump or the main circuit breaker.
Next, turn off the water supply to the shower pump. If isolation valves are installed, then turn off both hot and cold water lines. If you are unsure about the supply lines, then you need to shut off your home’s main water supply.
If you’re unsure at any stage, it’s best to consult a qualified plumber.
Step 2: Drain the Water System
Before disconnecting anything, drain out any remaining water from the pipes to avoid a mess. Turn on the nearby faucet to release the water pressure and drain out the remaining water. Keep towels or a bucket to collect any extra drips.
Step 3: Disconnect the Old Pump
It is time to remove the old pump. Using an adjustable spanner or wrench, loosen the nuts connected to the pipes. Keep the towels nearby, bit of water may spill out when you do this.
Once the pump is disconnected, unscrew any bolts or screws securing it in place. Gently remove the old pump and keep it aside for safe disposal.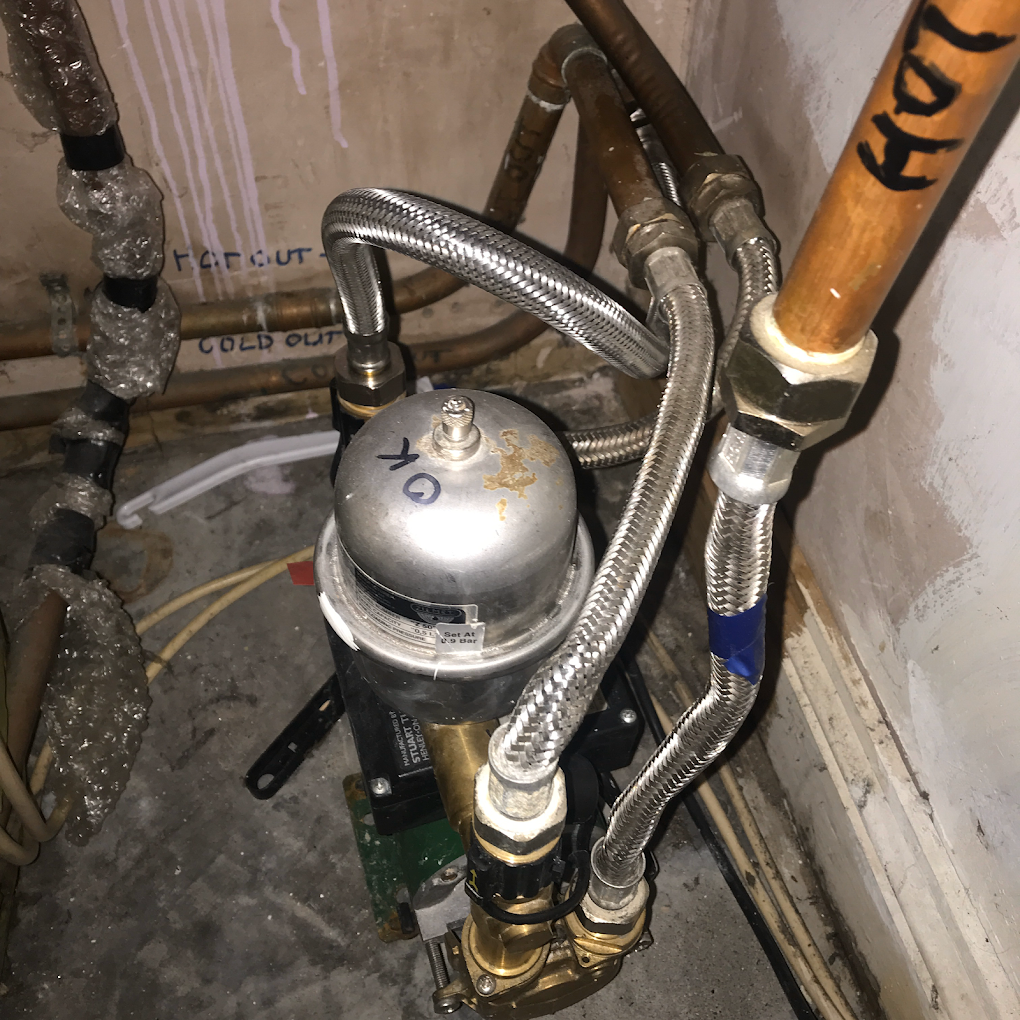
Step 4: Prepare the New Pump
Before installing the new pump, check the instructions provided by the manufacturer. All pumps are not the same, so double-check any specific installation steps for your model.
Wrap the threads on the pipe connections with the PTFE tape to create a watertight seal. It will reduce the chance of leaks.
Step 5: Install the New Pump
Carefully position the new pump in the correct mounting location. Align the inlet and outlet pipes with the existing system. Once you are positioned properly tighten the nuts and secure the connections using the spanners. Overtighten may damage the connections, so tight enough to prevent leaks.
Looking for professional installation? Learn more about our Shower Pump Installation Dublin service
Step 6: Double-Check Everything
Before turning on the water and power supply, check everything to make sure of safety.
- Check all connections are tight
- Check PTFE tape is applied to all pipe threads
- Check the pump is securely mounted.
Step 7: Turn the Water and Power Back On
Now, it’s time for your excitement. Turn the water supply back on, check for leaks, then restore power. Test the shower to confirm the pump is running smoothly.
Once the pump is powered up, turn on your shower and enjoy the improved water pressure!
Step 8: Test the System
Let the pump run for a few minutes to make sure it is working properly. Listen for any unusual noises. If everything is running smoothly, congratulations. You’ve successfully replaced your shower pump!
Common Mistakes When Replacing a Shower Pump
Even confident DIY homeowners can run into problems. The most common issues we see include:
Installing the wrong type (positive vs negative head)
Not isolating electrical supply safely
Overtightening fittings and damaging threads
Failing to flush debris before connecting the new pump
Installing without anti-vibration support, causing noise
Incorrect installation can lead to leaks, airlocks, noise issues, or early pump failure. If you are unsure about compatibility or wiring, it is safer to consult a professional plumber.
DIY vs Professional Shower Pump Replacement
Option |
DIY |
Professional |
|---|---|---|
Cost
|
Lower
|
Higher
|
Warranty Protection
|
No
|
Yes
|
Electrical Safety
|
Risk
|
Safe
|
Installation Time
|
Variable
|
1–2 Hours
|
Tips for a Smooth Installation
Choose the right pump: Make sure your new pump matches your home’s water system (e.g., positive or negative head).
Install isolation valves: If your system doesn’t have them already install isolation valves during the replacement. They make future maintenance much easier.
Check the warranty: Keep your receipt and check the warranty on your new pump in case any issues arise later.
Prefer Professional Installation?
Shower pump replacement may look straightforward, but incorrect fitting can cause leaks, electrical issues, or premature failure.
If you prefer professional help, our experienced team can assist with shower pump replacement and installation. With over 24 years of experience, we ensure:
Correct pump selection (positive or negative head)
Safe electrical isolation
Leak-free connections
Quiet and vibration-free installation
Manufacturer warranty protection
If you prefer peace of mind, contact our team for a clear and competitive quote.
Common Shower Pump Brands We Replace
At Dublin Shower Pumps, we regularly replace and install all major shower pump brands found in Irish homes. The most common brands we work with include Stuart Turner, Salamander, Grundfos, ESP, and Techflow. Each manufacturer offers different pump types designed for gravity-fed and low-pressure water systems.
As authorised Stuart Turner installers, we frequently fit Monsoon, M-Series, and Universal pumps, while also supplying suitable alternatives where required. If you’re unsure which shower pump is installed in your home, our team can identify the system and recommend the most reliable replacement based on your water pressure, usage requirements, and budget.
Why choose us?
- Experienced professionals: We’ve been in the business for 23 years, handling all types of shower systems.
- Quick and reliable service: We aim to complete all installations efficiently, and safely.
- Customer satisfaction: Your satisfaction is our priority, and we won’t leave until you’re happy with the result!
Call Dublin Shower Pump today for a free quote, and let’s get your shower running smoothly again.
⭐⭐⭐⭐⭐ George changed our water pump quickly , Very nice man to deal with , highly recommended 👍-Marifi Labanza (Google Reviews)
Shower pump replacement typically costs €750–€1,350 including supply and fitting. The exact price depends on the pump type, brand, and your home’s plumbing setup.
Most replacements are completed within 2–4 hours. More complex jobs, such as additional pipework or electrical adjustments, may take longer.
Shower pump replacement restores water pressure by changing the pump, while shower replacement means fitting a completely new shower unit or bathroom system.
Yes. A qualified plumber should carry out shower pump replacement because it involves both plumbing and electrical work. This ensures safety and compliance with Irish regulations.
Yes. Modern pumps from brands like Stuart Turner and Salamander are designed with noise-reduction features, making them much quieter than older models.
Conclusion
Replacing a shower pump might seem like a big job, but with the right preparation and a little patience, you can tackle it yourself. Improving your water pressure with a new pump can make a huge difference to your daily shower experience, and knowing you did it on your own? That’s just the cherry on top!
If you decide not to DIY, contacting a qualified plumber ensures the job is completed safely and correctly.

This guide was reviewed and verified by George Pahomi
Certified plumber with 24+ years of experience installing and replacing shower pumps across Dublin. George leads the Dublin Shower Pumps team, specialising in Stuart Turner and Salamander systems.